* * * * * [path/to/php] [path/to/suite/instance]/bin/console {-e [env]} schedulers:run > /dev/null 2>&1
Schedulers
Schedulers
This documentation is for SuiteCRM 8.9.0+
What are Schedulers?
Schedulers are automated tasks that run at specified intervals to perform various functions within SuiteCRM. They help streamline processes and ensure that routine tasks are handled efficiently without manual intervention.
Setting up the Scheduler
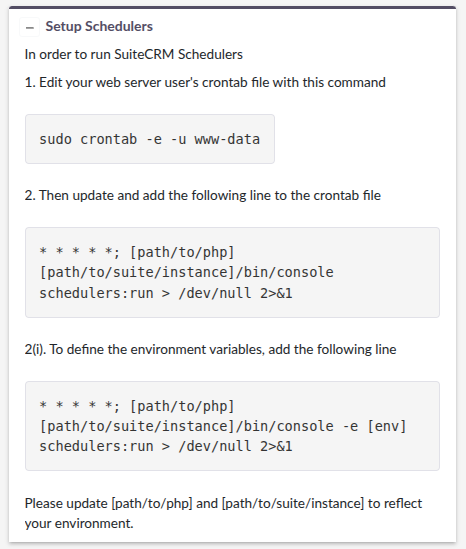
To enable schedulers, configure the system to run the ./bin/console schedulers:run command every minute. This ensures all SuiteCRM jobs are executed according to their schedules.
On Windows, use the system’s "Task Scheduler" to set this up. On Linux and iOS (the focus here), use crontab.
You can add the necessary command to your crontab:
Note: {-e [env]} is optional and specifies the environment.
After installation, these instructions remain accessible at the bottom of the Admin / Schedulers screen.
To prevent permissions issues with Scheduler jobs, it is recommended to execute them using the same user account that runs your web server.
If you need to use a different user account, you must modify the allowed_cron_users array in config.php to include that user.
There is also a small step by step shown on the schedulers listview:
To see more information about setting up, refer to the "Crontab Info" section below.
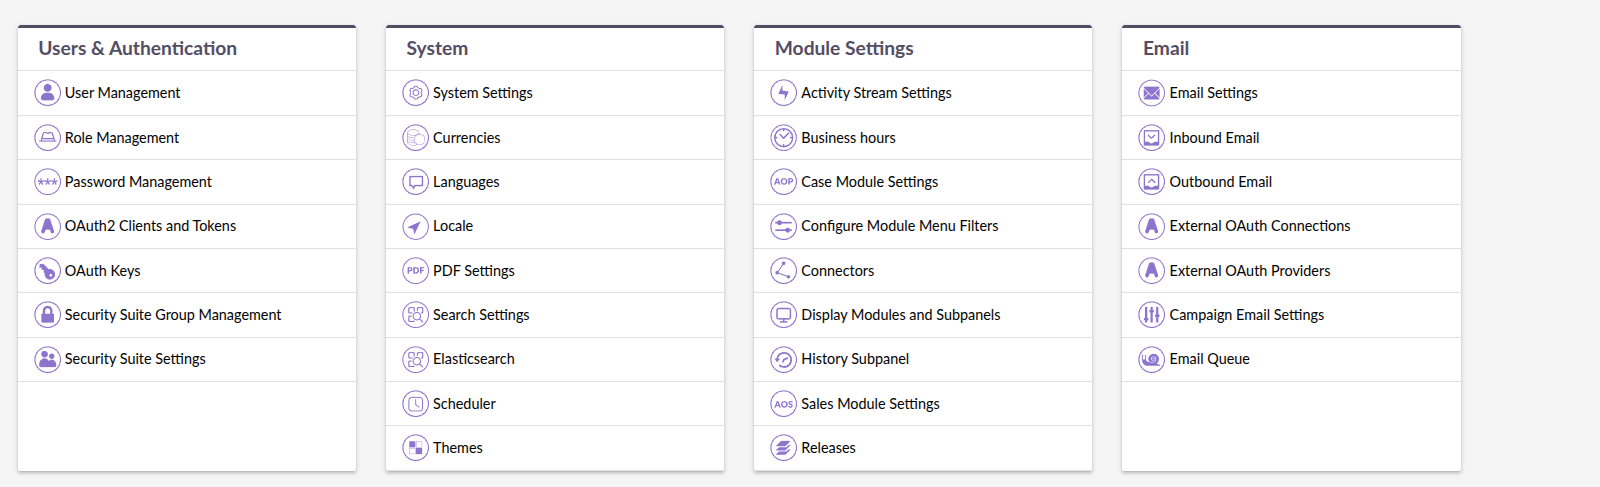
Accessing Schedulers
To access the Schedulers module, navigate to the Administration panel and select "Schedulers" from the "System" section.
Managing Schedulers
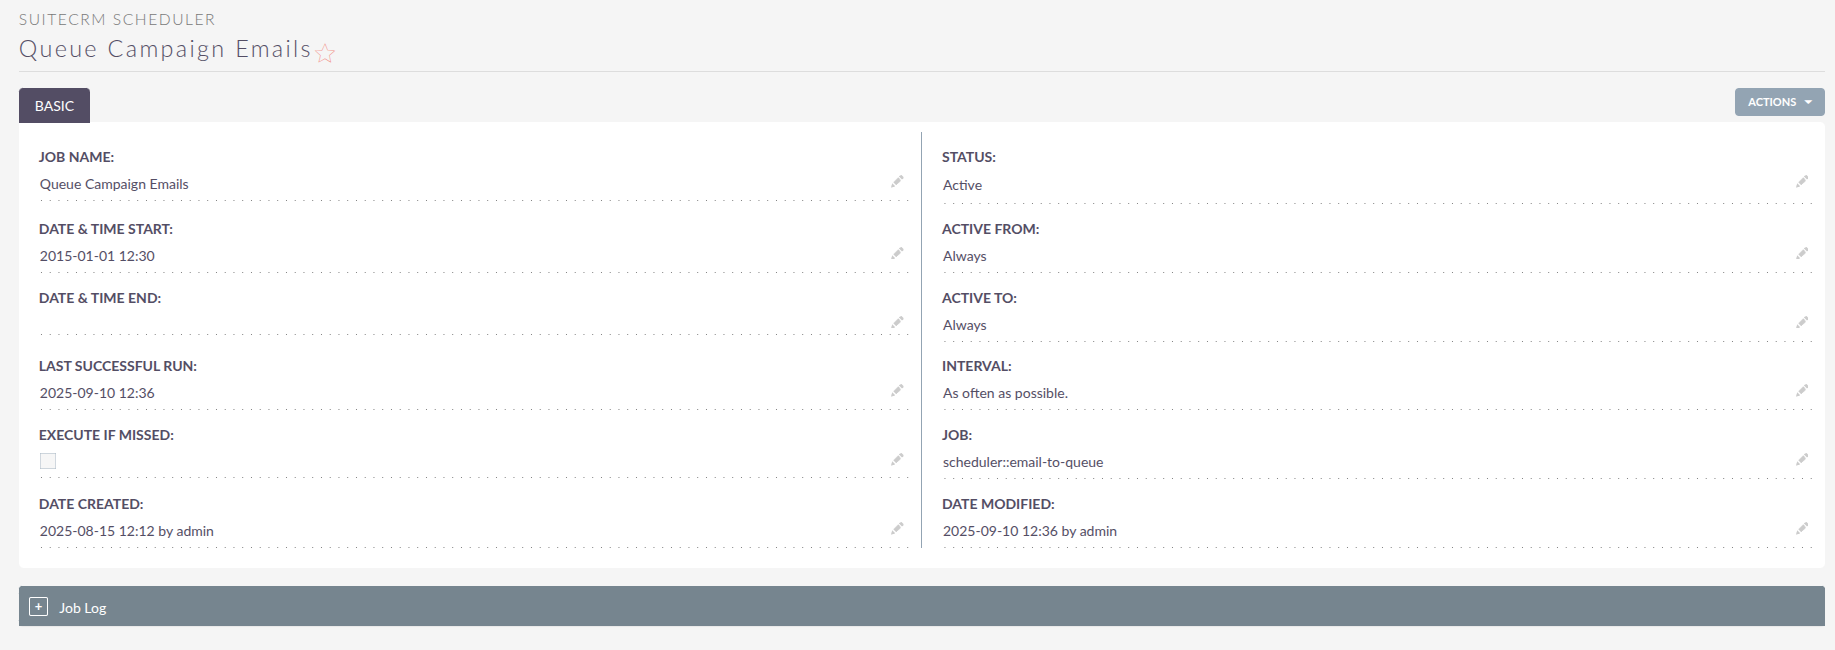
In the Schedulers module, you can view a list of all schedulers along with their status, interval and range (start to end date).

To see detailed information about a scheduler, click on its name to open the Detail View.
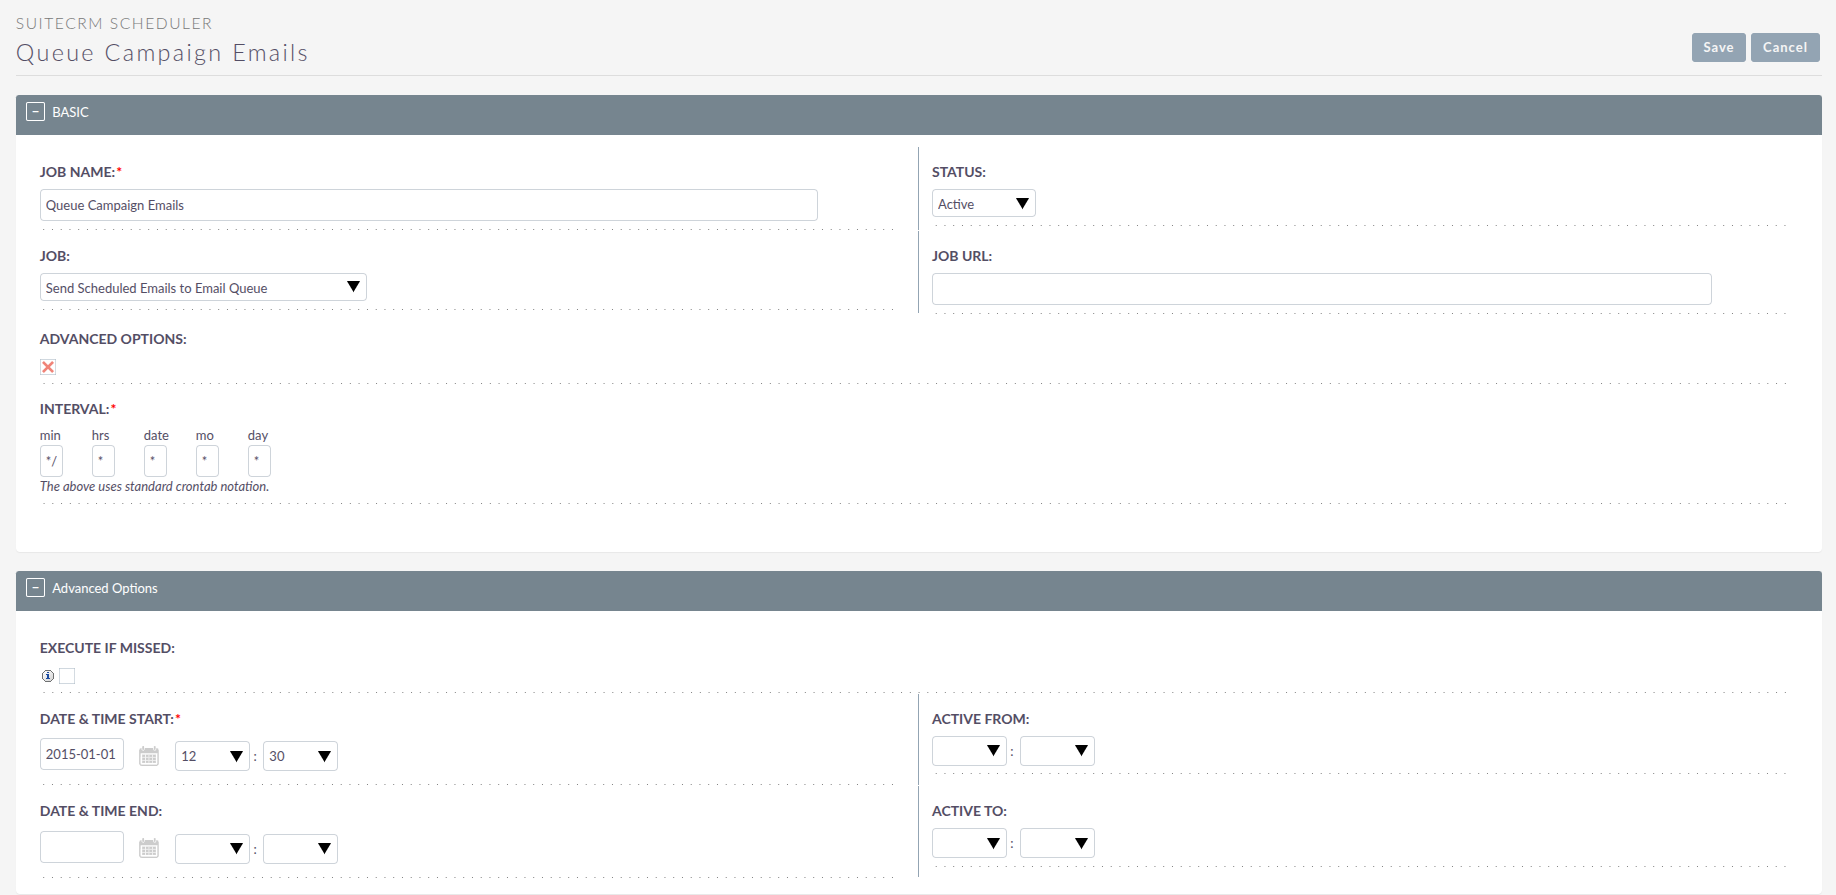
Updating Schedulers
To update a scheduler, click the "Edit" button from the "Actions" dropdown.
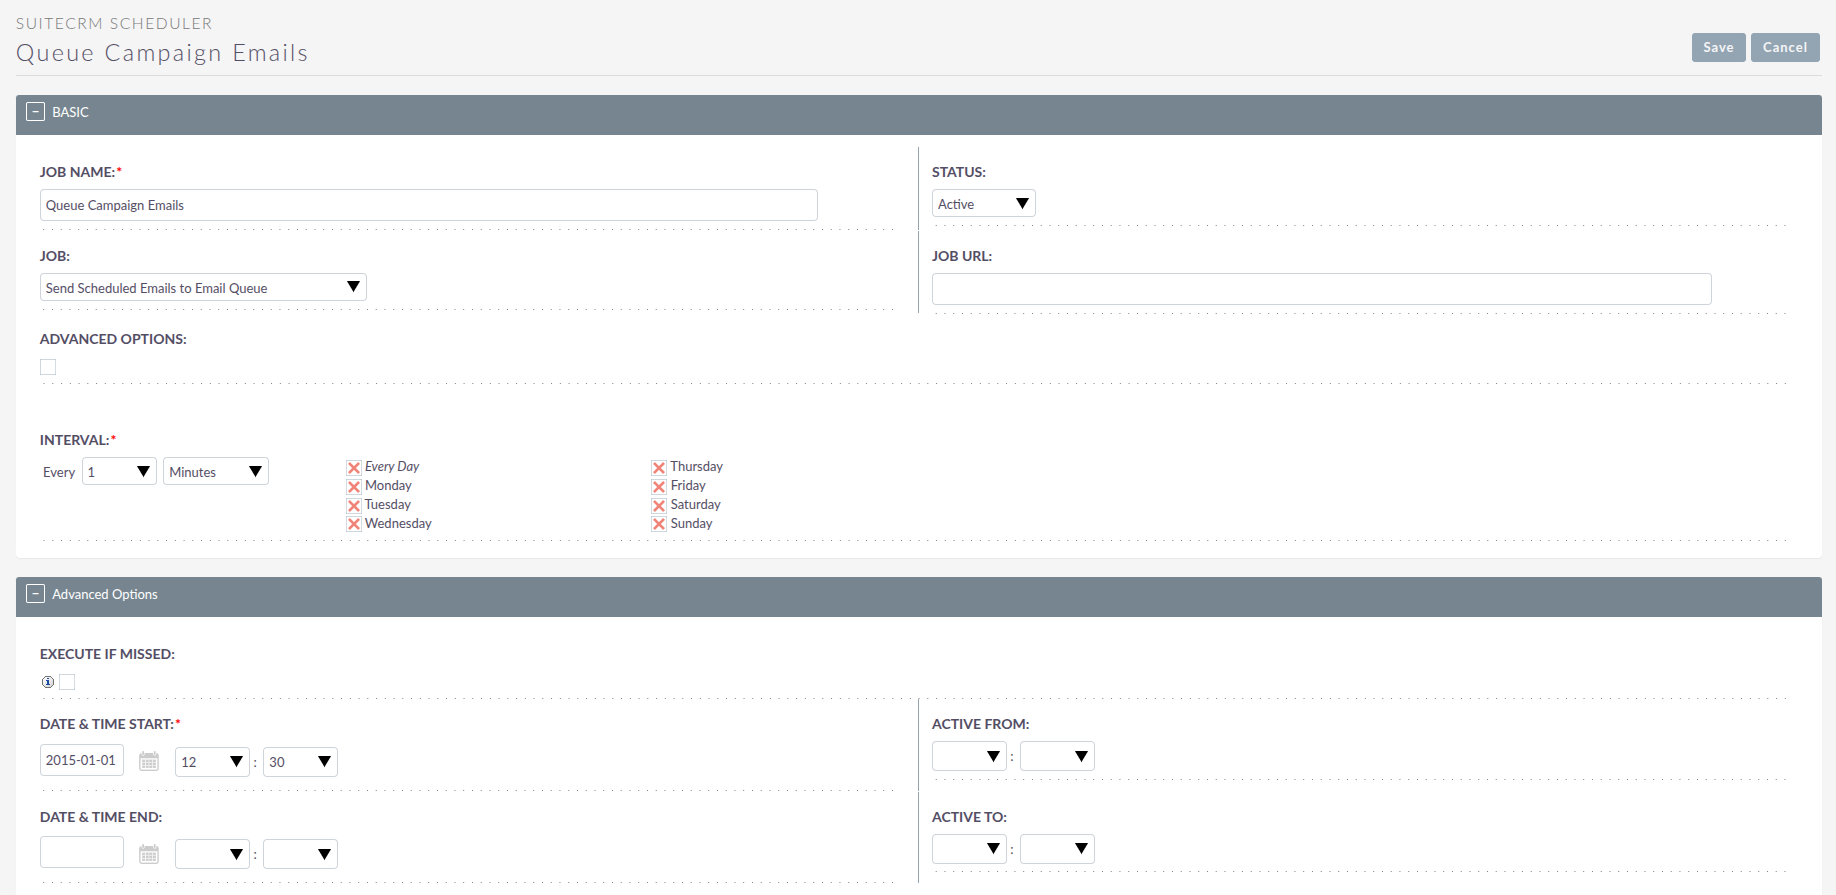
While editing, you can set the job status (only Active jobs will run) and configure the interval at which the job runs as well as the start time.
Unchecking the 'Advanced Options' box will show a more user-friendly way to set the job interval if you are not familiar with the crontab notation. Re-checking Advanced Options will let you set the initial start time.
Available Schedulers
The following schedulers are available in SuiteCRM:
Process Workflow Tasks |
This job processes all workflow tasks that are due to run. |
Run Report Generation Scheduled Tasks |
This job processes all scheduled reports and sends them out. |
Prune Tracker Tables |
Clean up old tracker data from the database. |
Check Inbound Mailboxes |
Checks all configured inbound email accounts for new messages. |
Run Nightly Process Bounced Campaign Emails |
Checks for new emails in bounced email accounts. |
Run Nightly Mass Email Campaigns (Inactive in SuiteCRM 8) |
Sends out mass email campaigns. (Inactive in SuiteCRM 8) |
Prune Database on 1st of Month |
Prunes the database of records that have been marked for deletion. |
Run Email Reminder Notifications |
Sends email reminders for activities. |
Removal of documents from filesystem |
Removes orphaned document files from the filesystem that are no longer referenced in the database. |
Prune SuiteCRM Feed Tables |
Prunes the SuiteCRM feed tables. |
Google Calendar Sync |
Synchronizes events between SuiteCRM and Google Calendar. |
SuiteCRM 8 Specific Schedulers
Clean Up Temporary Files |
Cleans up temporary files uploaded through file and attachment fields. |
Queue Campaign Emails |
Queues Email Marketing Records that are scheduled to be sent. |
Send Campaign Emails |
Sends the queued emails for Email Marketing Records. |
Prune Database scheduler |
Prune Database scheduler has been moved to symfony side and now also removes media objects from the new storage system. |
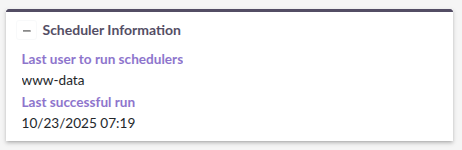
How do I know if Schedulers are working?
To see if schedulers are working / running, there is an added widget on Schedulers Listview to show:
-
The last user to run schedulers.
-
Last successful run time.
Crontab Info
What are the crontab basics I need to understand?
In Linux there can be one crontab per user. This applies even to users
who can’t login to a shell, like the standard web-server users found in
many default installations (like www-data and nobody).
The following examples will use www-data.
To list the contents of a specific user’s crontab, use something like this command:
sudo crontab -l -u www-data
And to edit those contents, use the -e switch instead:
sudo crontab -e -u www-data
Some flavors of Linux (notably Ubuntu) have yet another crontab which is the system-wide crontab. This is edited by editing a file:
sudo nano /etc/crontab
Notice that the comments inside this crontab explain that it is the system-wide crontab. Here you can specify commands to be run as any user, so it has an extra column where you say which user the command runs under, for example:
* * * * * www-data [path/to/php] [path/to/suite/instance]/bin/console {-e [env]} schedulers:run > /dev/null 2>&1
Note: {-e [env]} is optional and specifies the environment.
Which user should these jobs run under?
The appropriate user varies depending on your system configuration. The recommended approach is to identify which user account runs your web server and configure your cron jobs to run under the same account. This approach streamlines permission management and prevents conflicts between the web application and scheduled jobs when they access shared databases and files.
Incorrect user configuration can cause serious problems with your installation. Ensure your permission settings allow both processes to read and write the same resources that either process creates or modifies.
If you previously ran cron jobs as root due to misconfiguration, after correcting the setup,
you must restore proper ownership and permissions across the entire SuiteCRM directory structure,
then perform a Quick Repair and Rebuild.
And how can I find out which user my web server runs under?
There are already several ways to determine this, and here are a few methods specific to SuiteCRM:
-
Go into
Admin / Schedulersand see that crontab command on the bottom of the screen. -
Check the
allowed_cron_userssection of your config.php file, it should be there. -
Go into
Admin / Diagnosticsand select onlyphpinfo. Once that file is produced, check theAPACHE_RUN_USERvalue it provides. (Note: don’t run php -i from the command-line, it’s not the same thing)
What is the allowed_cron_users section in config.php?
Only users specified in the allowed_cron_users array within config.php (located in your SuiteCRM installation root) are permitted to execute ./bin/console schedulers:run. Any other users will cause that script to terminate itself every time it starts.
Normally, you don’t have to do anything to add a valid user to this array, since SuiteCRM installer will do that for you automatically, adding the current web server user, if it is not already there.
You can add more than one allowed user. root is particularly NOT
recommended, and the Installer does not add root even if it the web
server user running the installer, you have to do so manually if you
really want to.
The relevant section of config.php might look like this:
config.php
'cron' =>
 	array (
		`max_cron_jobs' => 10,
		`max_cron_runtime' => 30,
		`min_cron_interval' => 30,
		`allowed_cron_users' =>
		array (
 			0 => `www-data',
		),
	),
Which command should I use in crontab?
The command to use in crontab is (as shown above):
* * * * * [path/to/php] [path/to/suite/instance]/bin/console {-e [env]} schedulers:run > /dev/null 2>&1
Note: {-e [env]} is optional and specifies the environment.
And now some specific, typical examples. First, Ubuntu Server, system-wide crontab:
* * * * * www-data [path/to/php] [path/to/suite/instance]/bin/console {-e [env]} schedulers:run > /dev/null 2>&1
Of course you can also use crontab’s syntax to make it run less frequently, which could prove relevant in a heavily used system. To run every two minutes, instead of every minute, change the first column, like this:
*/2 * * * * [path/to/php] [path/to/suite/instance]/bin/console {-e [env]} schedulers:run > /dev/null 2>&1
How can I make sure the jobs are actually running?
-
The Schedulers Module, via the admin panel, will show latest run times of each job, also any errors.
-
SuiteCRM’s suitecrm.log will record these events, provided your log level is configured to capture them (you can view and modify it from Admin / System Settings).
-
In case some specific Scheduler Job is failing with an error, the suitecrm.log is also the place to start troubleshooting, along with the Web Server’s log (often called
php_errors.log).